
|
The copyright of all images shown
on this page is owned by M. Feuerbacher.
|
by M. Feuerbacher, 2003.
The Konica Auto S2 is a very nice camera, but this specimen arrived in a terrible state. It was very dirty and appeared to have the following defects:
A bigger job with several problems to solve...
| Remove the name plate and the built in lens shade. The name plate contains the meter cell, which should be desoldered. Before desoldering, make a sketch where the blue and black wires came from. In my camera one of the wires was broken - no surprise that the meter didn't work. | |
| The front lens cell can be removed as a whole. Its thread is right-handed, as all others in the following. Grip the side of the lens-cell tube or use a friction tool (rubber pad mounted on a hard handle). |  |
| The aperture is met after removing the front-lens cell. The next part of the barrel can be removed by opening the wiggled ring (turn the sealed locking screw). This ring keeps the front of the lens barrel in place. It was loose in this camera. |  |
| Then the front side of the shutter is accessible. In this image you see it with the cocking rack on top. |  |
| The cocking rack has been removed. I tried to fix the shutter and aperture by cleaning the blades, the shutter gears, all the axes and pivots, but it wouldnt work. |  |
| Therefore I decided to go further and approach the lens and the shutter mechanism from the back side. The top cover and the leatherette have to be removed.The leatherette comes off well and does not tend to rip. Four screws show up, which have to be removed to detach the lens from the body. |  |
|
The lens has been detached. This is not problematic for the Konica Auto S3 and attaching it after the job is straightforward and uncritical - only the cocking shaft has to be threaded into the corresponding hole, all other parts easily slip into place. The piece which was rattling in the body is shown left to the lens. Its origin is shown by the arrow.
|
 |
| By removing the retainer ring and the rear lens cell the back side of the shutter can be reached. Now there is no glass in the way, so you can mess around with solvents and dirt without causing too much damage. |  |
|
The aperture selection mechanism: Pin (a) is moving on a cam (b) on the aperture selection rim. This moves a lever which defines the position of (c), which directly controls the aperture opening. Applying some solvent (lighter fluid, petroleum benzine, etc.) and cleaning the blades once more from this side brought the aperture mechanism back to life. Subsequently little pin fell out of the shutter mechanism. I seems to have blocked the shutter, which subsequently started to move. Some more solvent finished the job. |
 |
| Finally a problem with the film counter, which did not advance upon winding, had to be fixed. |  |
| The rightmost arm blocking the rotation of the plastic cogwheel turned out to be the problem. The spring wire has fallen out of place and the axe was corroded to it wouldnt move. Replacing the spring and cleaning the axe fixed the problem. |  |
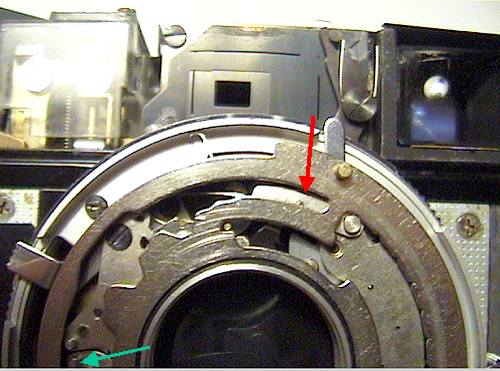
| This part really gave me the creeps upon reassembling the lens barrel. It is responsible for the clicks of the exposure-time selection wheel. With the help of the colleagues in the camera repair forum and after some diskussion with Erik Fiss I was able to get it back into place... |  |
|
Important is the little pin located at the end of the self-timer housing (red arrow). (This was the pin that had blocked the shutter). The round end of the above part connects to the grooves in the cocking rack and the bent part pushes against the inside of the barrel to produce the necessary tension. When you attach the front part of the lens barrel, make sure that the pin marked by the green arrow sits in a hole on the back of the brass plate seen in Fig. 3. This prevents the front part from rotation. |
 |